The 2nd session of 2014 is in the books; and with a 6 month layoff, performance was pretty decent.
This was the first session that included lunch with the deal and my lovely wife answered the call of duty to put together some great BBQ with traditional sides. Dessert was her famous chocolate chip cookies that again drew great reviews.
I felt that the session was fairly successful, but it did reveal some growing pains and I have a fairly large list of fix-it items to handle before the next session in December.
The crew was a bit over large, as your host munged up the signups and had to beg forgiveness from all. It was just a bit crowded in the layout room, but I think everybody mostly stayed out of each others' way.
Crew:
Keith S - Dispatcher
Mike G - Staging Manager
Dick M - Yard Master
Erwin - Asst Yard Master
Jerry - Road Crew
Doug - Road Crew
Dan - Road Crew
Wayland - Road Crew
Pictures should hopefully be forthcoming from the company photographer as management left the camera out of the railroad room.
Monday, November 10, 2014
Tuesday, October 14, 2014
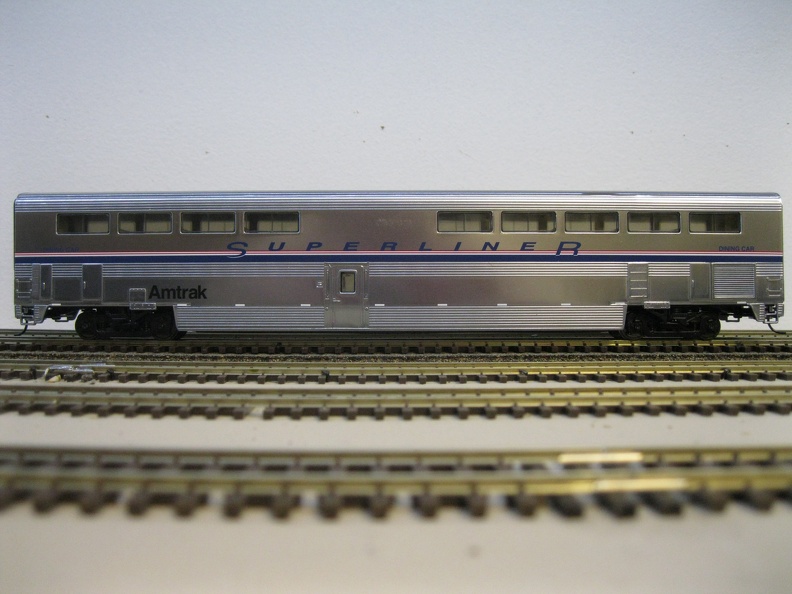
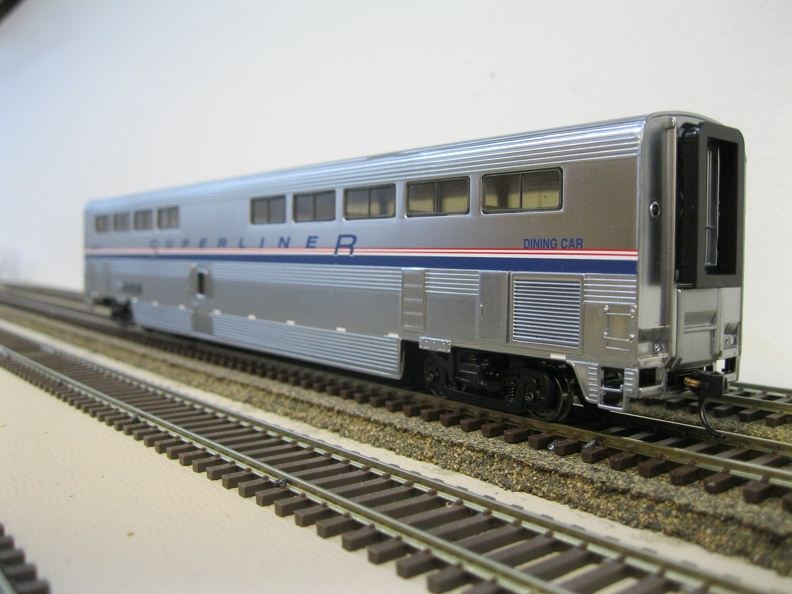
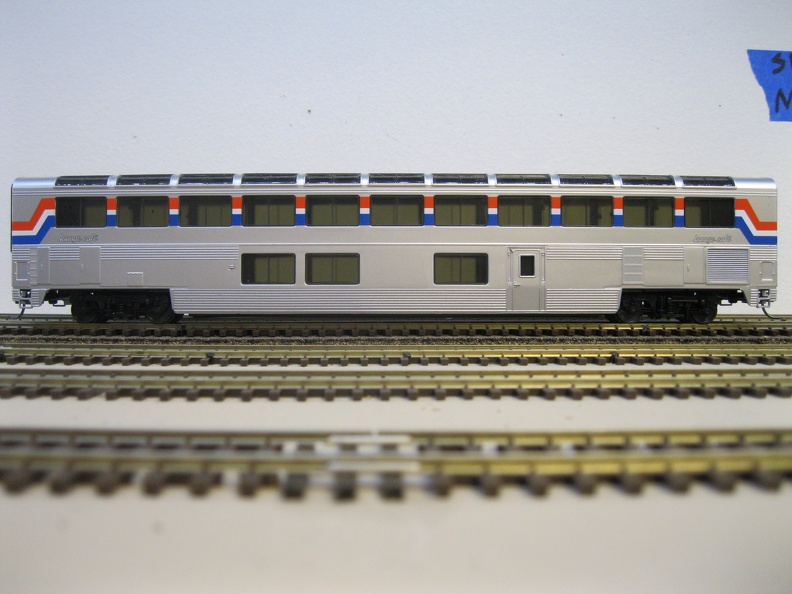
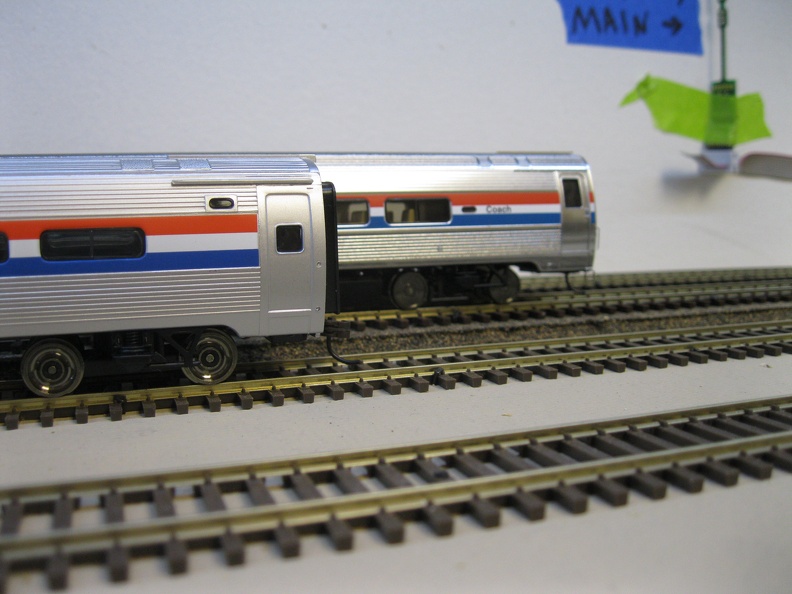
Amtrak, Part IV, Model Car Part II - Superliners
The Superliner cars have been well represented in HO scale; with multiple offerings from Walthers, Kato and a few brass lines over the years.
We are very fortunate that these cars have been the subject of lots of good models over the years, as the prototype cars are a significant part of the fleet.
The idea of a multiple level car for long distance routes was first done by the ATSF for service on the El Capitan. Budd built these cars starting 1954, with a couple of runs as the years went on. Of course, as passenger service faded, the railroads stopped buying new varnish. With Amtrak's 1971 start, new cars began to be purchased again. For more information on these cars, take a look at wikipedia here and here.
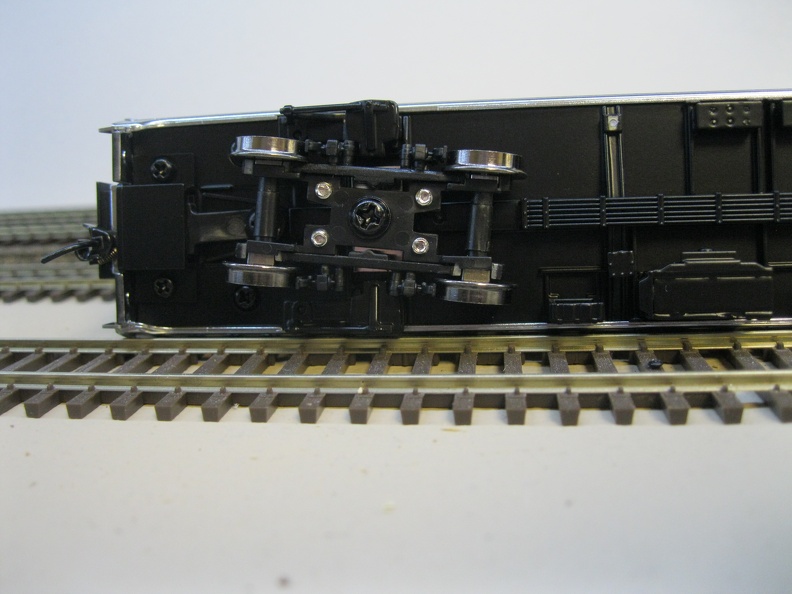
There are two major runs of Superliners, each was produced by a different manufacturer; called Superliner I and Superliner II. The major spotting difference is the trucks. The I has a very intricate design from a German firm, while the II uses a GSC truck. The truck details have been carried over into the models.
Now, the models have been pretty decent quality. The first run from Walthers was pretty decent, but detail was fair for the time period and looking at them now, details are lacking.
One thing to keep in mind is that these cars have almost no underbody pieces, as the prototype designs moved all that equipment to the lower level ends of the cars.
The later runs from Walthers, with the 'new plated' finish are very nice indeed and the Kato units run neck and neck with them. The Walthers offerings are a bit cheaper in my experience and I've amassed quite a few of them to be able to run the Auto-Train on my layout. (As the Auto-train is the only Superliner equipped train in the southeast.)
The diners, coaches and sleepers and fairly similar across the line; the differences are in the numbers of windows and their spacing.
Here are a few of the model cars; captions provided to give additional information.
First we will start at the current production plated car, from Walthers:


Now, let's move on to a older production car from Walthers without the plating.

We are very fortunate that these cars have been the subject of lots of good models over the years, as the prototype cars are a significant part of the fleet.
The idea of a multiple level car for long distance routes was first done by the ATSF for service on the El Capitan. Budd built these cars starting 1954, with a couple of runs as the years went on. Of course, as passenger service faded, the railroads stopped buying new varnish. With Amtrak's 1971 start, new cars began to be purchased again. For more information on these cars, take a look at wikipedia here and here.
There are two major runs of Superliners, each was produced by a different manufacturer; called Superliner I and Superliner II. The major spotting difference is the trucks. The I has a very intricate design from a German firm, while the II uses a GSC truck. The truck details have been carried over into the models.
Now, the models have been pretty decent quality. The first run from Walthers was pretty decent, but detail was fair for the time period and looking at them now, details are lacking.
One thing to keep in mind is that these cars have almost no underbody pieces, as the prototype designs moved all that equipment to the lower level ends of the cars.
The later runs from Walthers, with the 'new plated' finish are very nice indeed and the Kato units run neck and neck with them. The Walthers offerings are a bit cheaper in my experience and I've amassed quite a few of them to be able to run the Auto-Train on my layout. (As the Auto-train is the only Superliner equipped train in the southeast.)
The diners, coaches and sleepers and fairly similar across the line; the differences are in the numbers of windows and their spacing.
Here are a few of the model cars; captions provided to give additional information.
First we will start at the current production plated car, from Walthers:
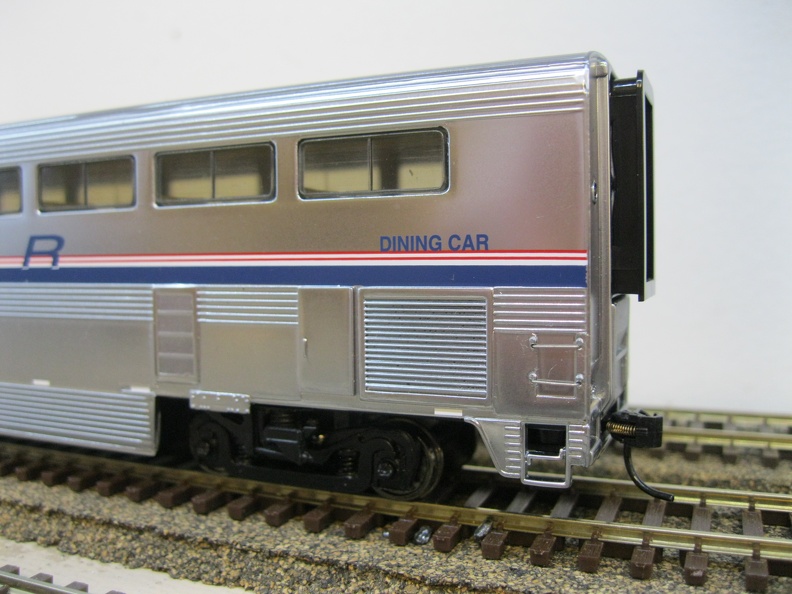 |
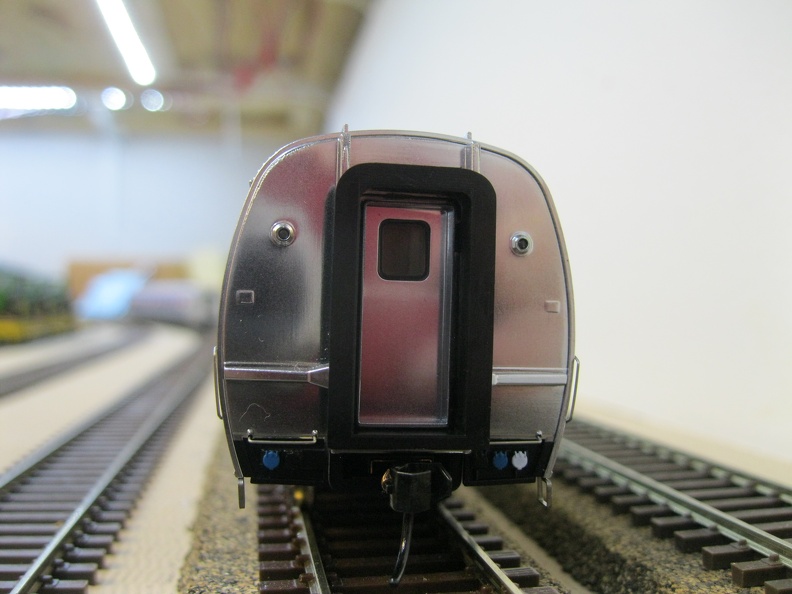
| This is a Superliner II - Note the truck. |
 |
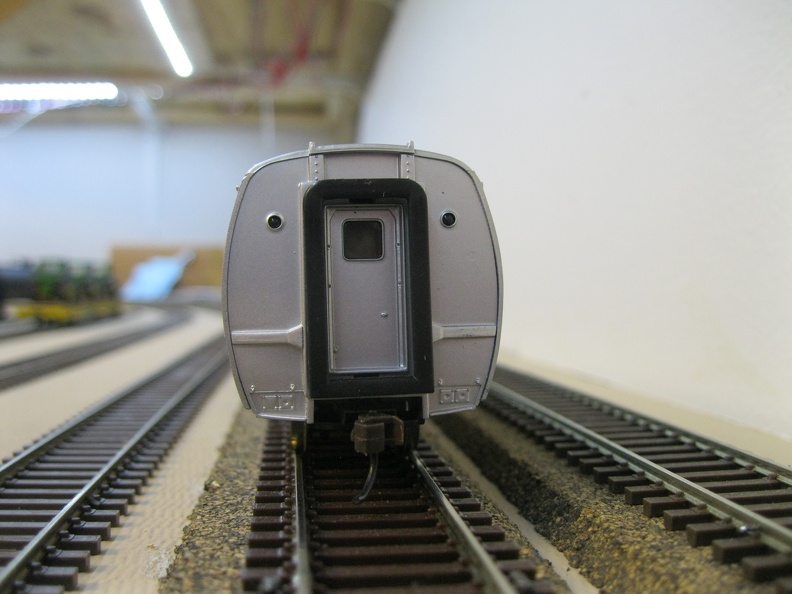
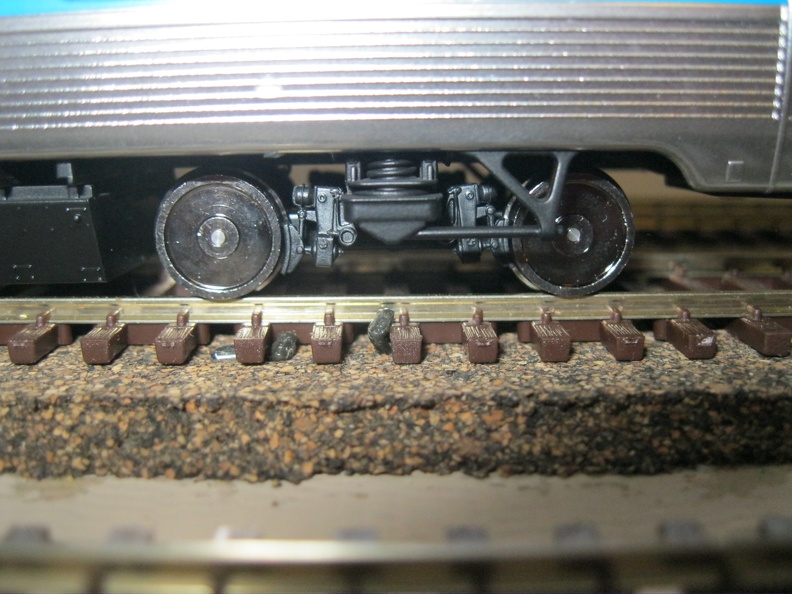
| Detail is decent, but not as sharp as the newer car. Note the stirrup steps. |
 |
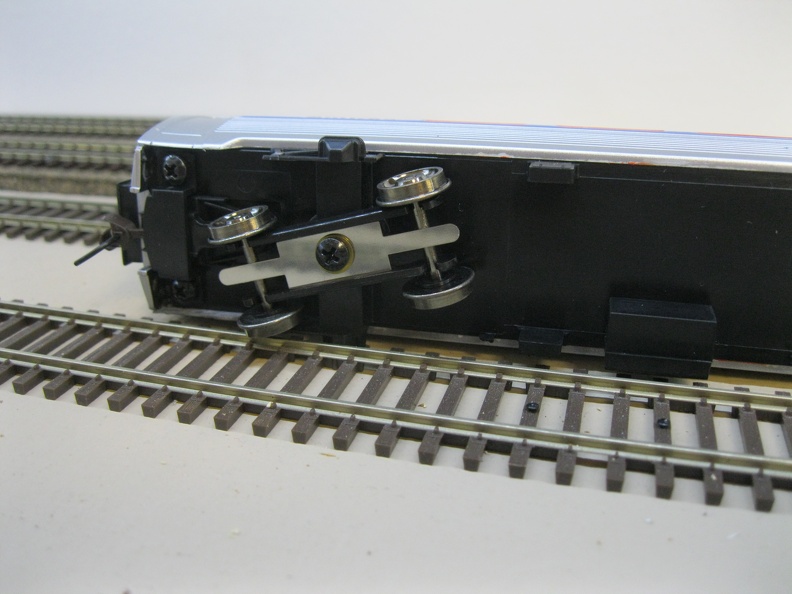
| Here's the Superliner 1 truck - much more complicated design. |
Tuesday, September 30, 2014
Coming in October
I've got a fair amount of content scheduled to come up in October. I'm going to talk about a couple of things from past conventions, a blurb or three about the local NMRA happenings, and then maybe hit what I'm doing to prepare for the next Operations session.
I have made a couple of small tweaks to the full site; I'm going to put up a 'Layout Tour' feature sometime fairly soon since I think that is something missing that would really illustrate what it is.
On the physical layout, I hope to get a chance to finish the upper staging yard this week. After that gets finished up, I've got a car card box or two build and then trackwork will start on the BB branch to the papermill. I might take a break for that and put some signals in; but I'll see how I feel.
Friday, September 19, 2014
Amtrak, Part III, Model Car Part I - Amfleet
The Amfleet cars actually have a fairly interesting history on the model front, at least in HO scale.
If you are interested in the more of the Amtrak fleet information, especially the stuff that is electric, a good resource for bunches of his model stuff is Kyle Nembhard; his site is here.
Anyway, for a pretty numerous prototype, accurate cars in HO scale have been just about non-existent. There was a brass version offered, I believe in the 1980's, that was the basis for some of the earlier plastic versions. Unfortunately, the brass model had a couple of issues that got carried over to the plastic version.
Both Walthers and Bachmann produced Amfleet cars, in various types and schemes and if you were operations focused, they could be considered 'good enough'.
Underbody detail was almost nonexistent, other details were lacking, and the overall shape wasn't quite right.
Walthers spun up to produce a Metroliner model a few years ago and thereafter, announced new Amfleet cars from totally new tooling, which was good and would be offered in their Protoline, which was also very positive. The one major downer was the price. Standard cars were priced at $79 and lighted cars were another $10.
The test version of the cars that I saw at Walther's booth at the 2012 train show were very nice and I was impressed at the level of detail on the car. I was still a bit taken aback by the eighty dollar price tag, but felt a bit better about what I was getting for my money.
Originally, these car were going to be available January 2013, but they finally shipped this year (2014) in late winter.
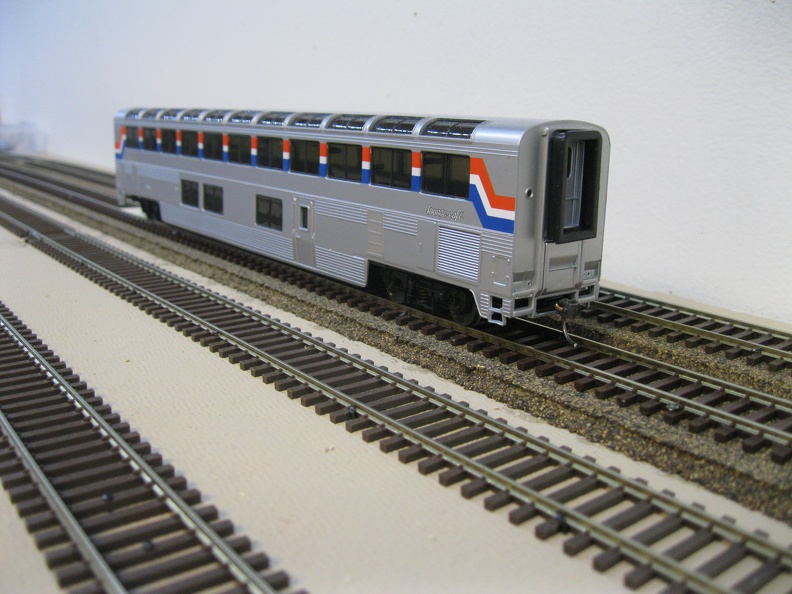
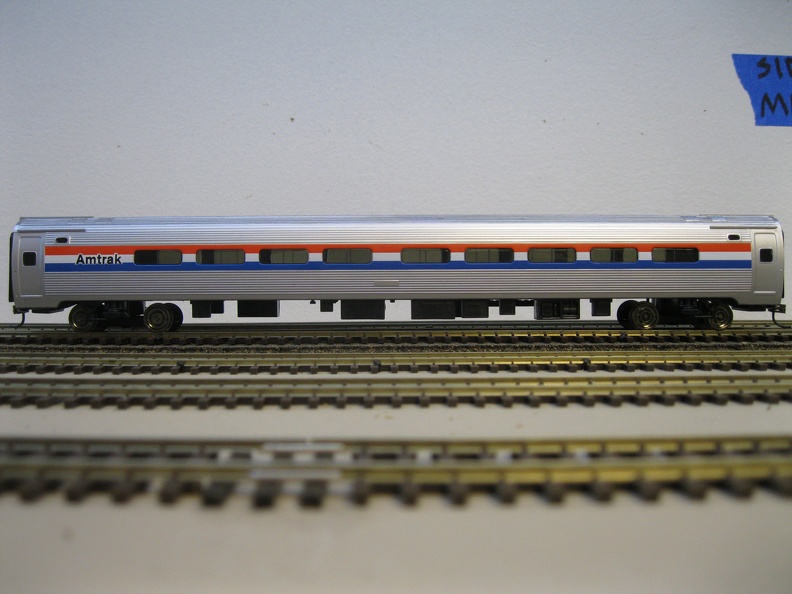
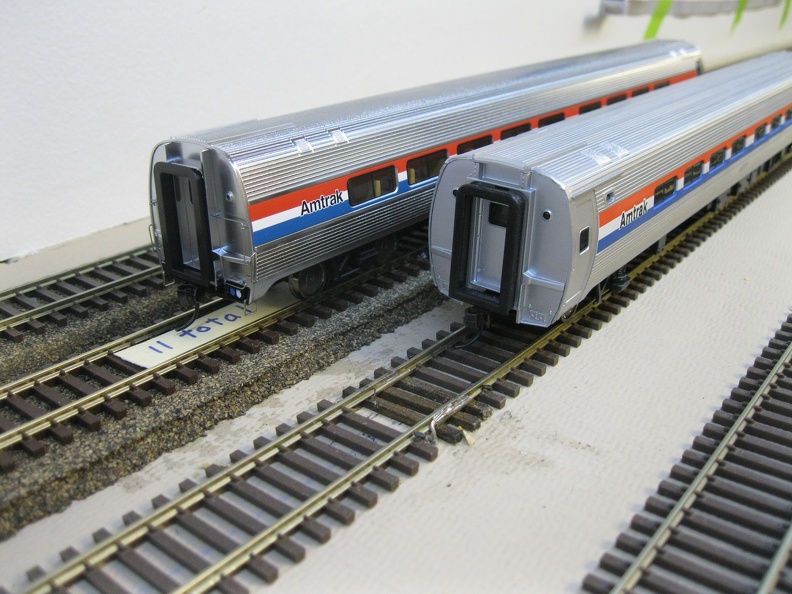
Here is the new car; this particular one is a coach.

Note the overall shine to simulate the stainless steel of the prototype car, the underbody details aplenty and the very light and lacy grab irons on the corners.
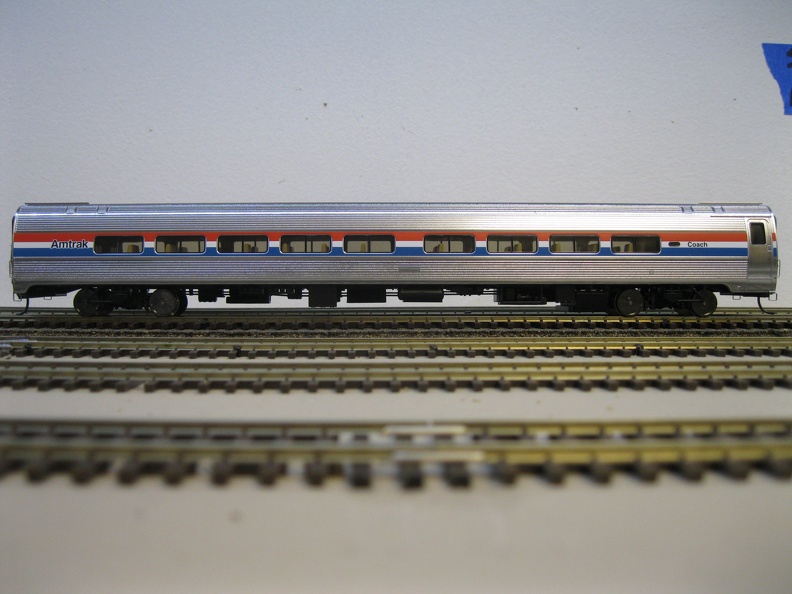
Now, let's look at one of the older production Walthers cars.
Less shiny to start with; you can see lots of air through the bottom of the car and grab irons are totally missing.

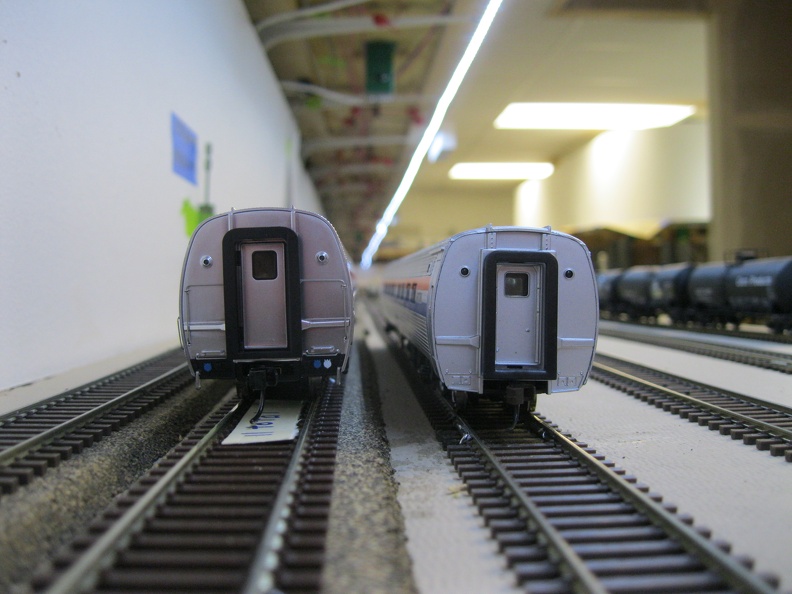
Let's look at a couple of other angles of these cars.


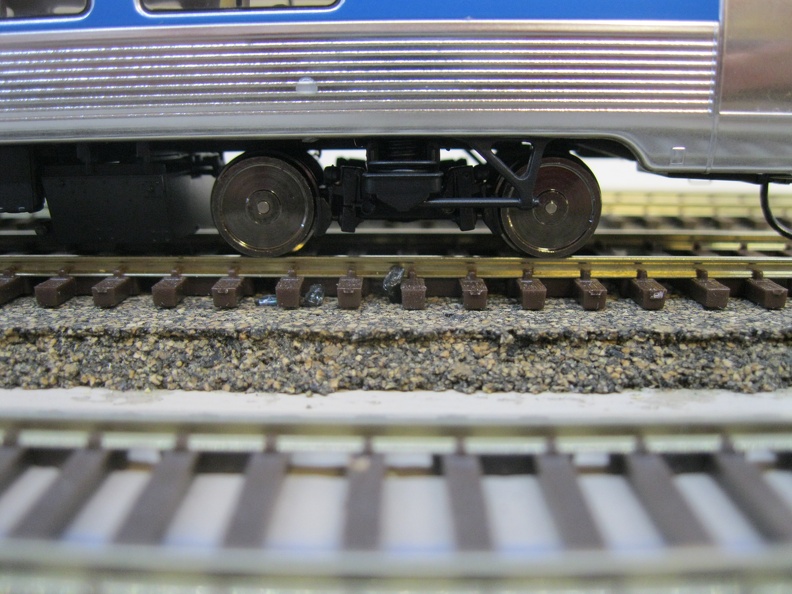
Again, the level of detail in the newer car (top picture) is much higher. Also, this shows the different profile of the cars; if you look near the upper corners, it is pretty noticeable.
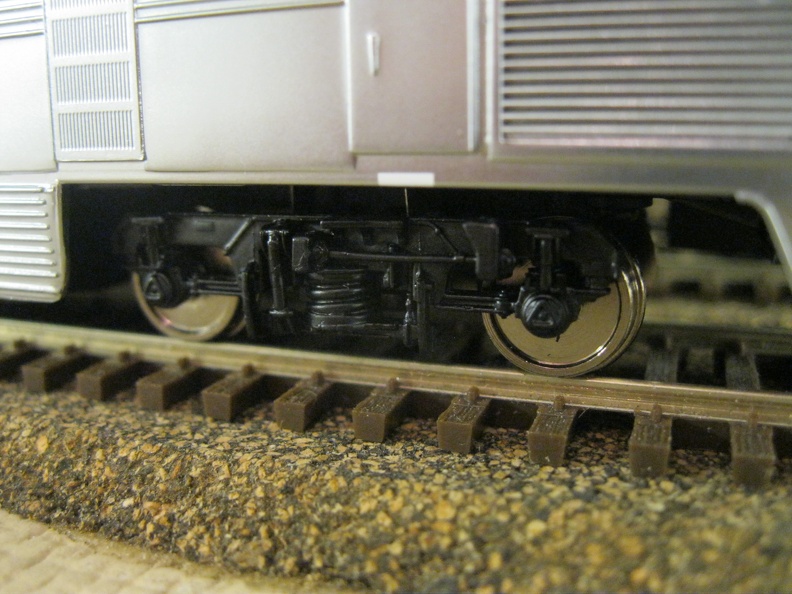
About the trucks for these older cars. The original design left lots of be desired.


Basic truck, no bearings and the axles will wander back and forth inside the truck. And if you want to light it, some work will be needed. Without some serious hacking, you will only get pickup on one rail per truck.
Now, the new truck is off the chain.


Let's finish up with some shots with both cars.


Coming up in this theme is a look at some of the Superliners, a look at the baggage cars and then hit the sleepers and diners.
If you are interested in the more of the Amtrak fleet information, especially the stuff that is electric, a good resource for bunches of his model stuff is Kyle Nembhard; his site is here.
Anyway, for a pretty numerous prototype, accurate cars in HO scale have been just about non-existent. There was a brass version offered, I believe in the 1980's, that was the basis for some of the earlier plastic versions. Unfortunately, the brass model had a couple of issues that got carried over to the plastic version.
Both Walthers and Bachmann produced Amfleet cars, in various types and schemes and if you were operations focused, they could be considered 'good enough'.
Underbody detail was almost nonexistent, other details were lacking, and the overall shape wasn't quite right.
Walthers spun up to produce a Metroliner model a few years ago and thereafter, announced new Amfleet cars from totally new tooling, which was good and would be offered in their Protoline, which was also very positive. The one major downer was the price. Standard cars were priced at $79 and lighted cars were another $10.
The test version of the cars that I saw at Walther's booth at the 2012 train show were very nice and I was impressed at the level of detail on the car. I was still a bit taken aback by the eighty dollar price tag, but felt a bit better about what I was getting for my money.
Originally, these car were going to be available January 2013, but they finally shipped this year (2014) in late winter.
Here is the new car; this particular one is a coach.
Note the overall shine to simulate the stainless steel of the prototype car, the underbody details aplenty and the very light and lacy grab irons on the corners.
Now, let's look at one of the older production Walthers cars.
Less shiny to start with; you can see lots of air through the bottom of the car and grab irons are totally missing.
Let's look at a couple of other angles of these cars.
Again, the level of detail in the newer car (top picture) is much higher. Also, this shows the different profile of the cars; if you look near the upper corners, it is pretty noticeable.
About the trucks for these older cars. The original design left lots of be desired.
Basic truck, no bearings and the axles will wander back and forth inside the truck. And if you want to light it, some work will be needed. Without some serious hacking, you will only get pickup on one rail per truck.
Now, the new truck is off the chain.
Let's finish up with some shots with both cars.
Coming up in this theme is a look at some of the Superliners, a look at the baggage cars and then hit the sleepers and diners.
Wednesday, September 17, 2014
Backdrops ready for blue
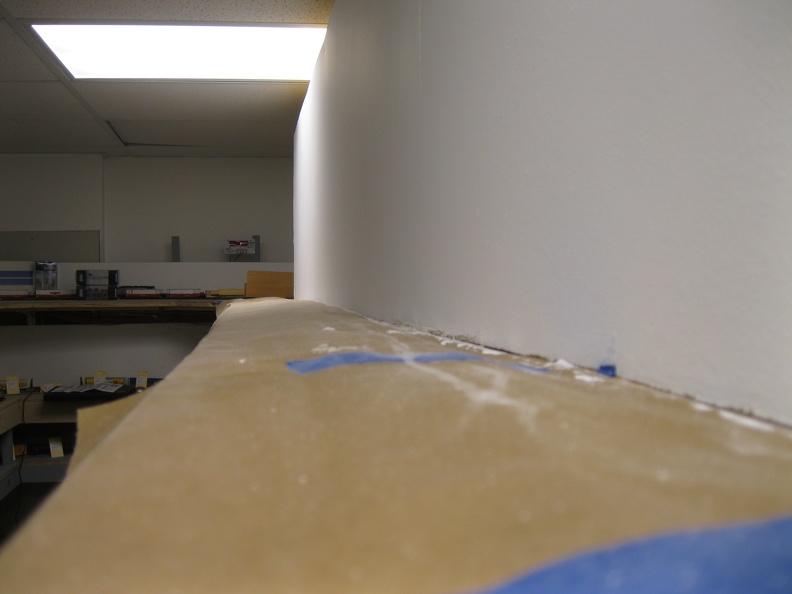
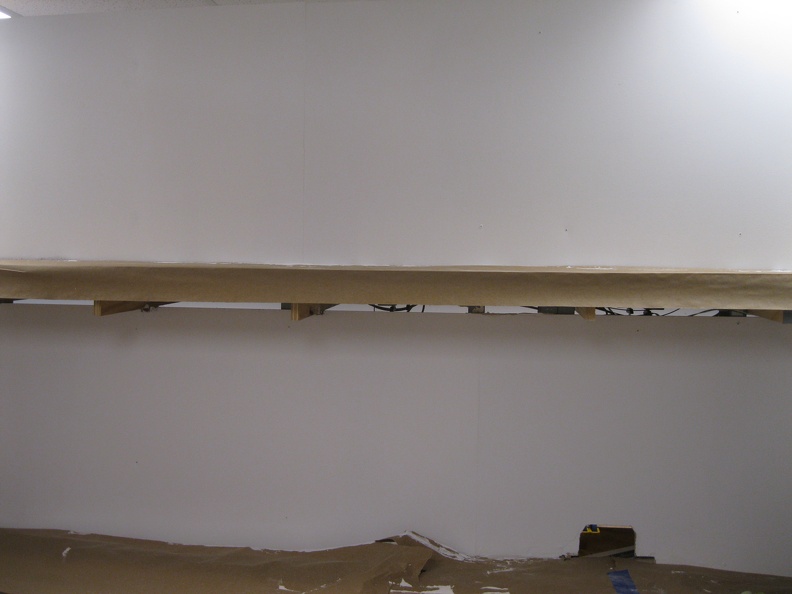
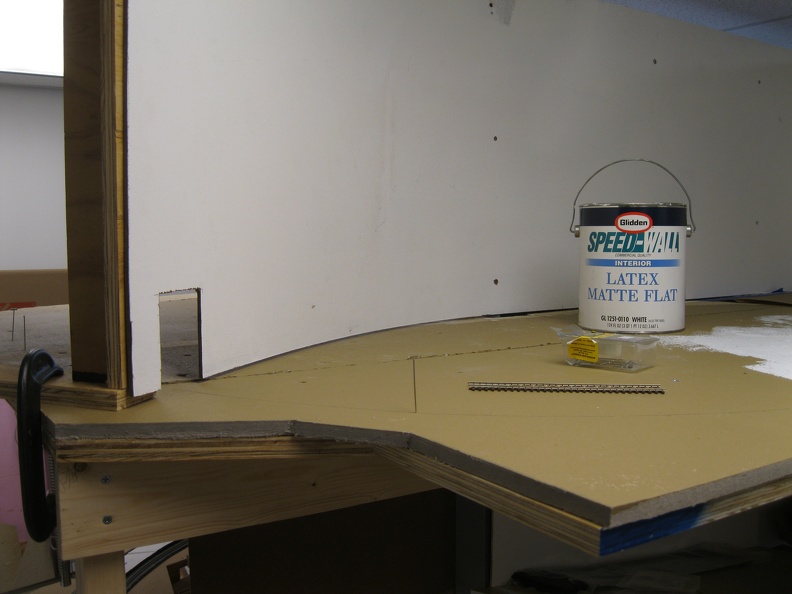
Finished up with the mud-sand-mud-sand process and slapped a coat of the white primer up onto the backdrops.
It isn't perfect, as cracks have already shown their cards, but for a layout with another 2 years or so of planned lifetime, I'm going to deal with it.


It isn't perfect, as cracks have already shown their cards, but for a layout with another 2 years or so of planned lifetime, I'm going to deal with it.
Saturday, September 13, 2014
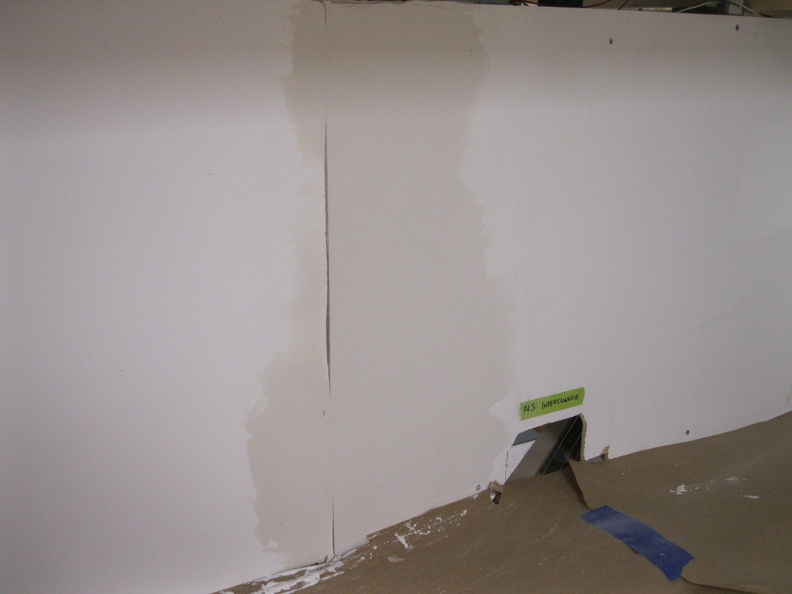
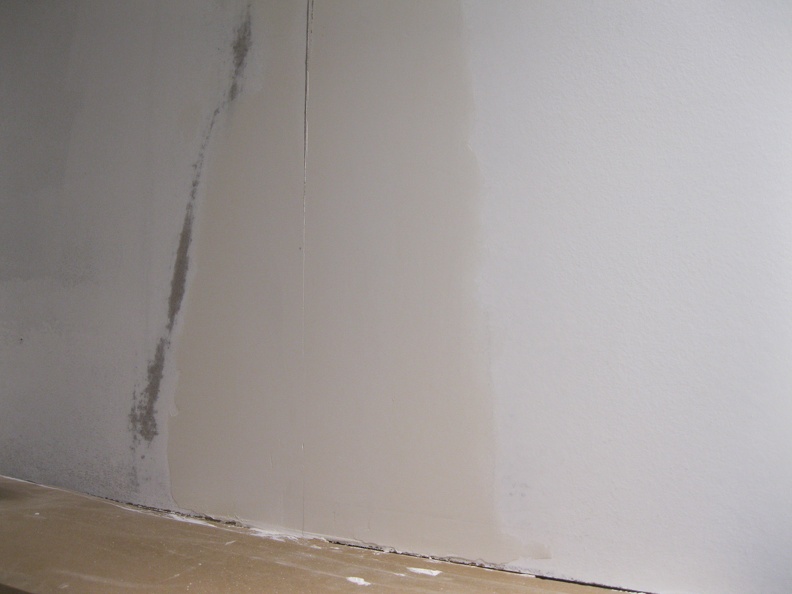
Still working on Backdrops
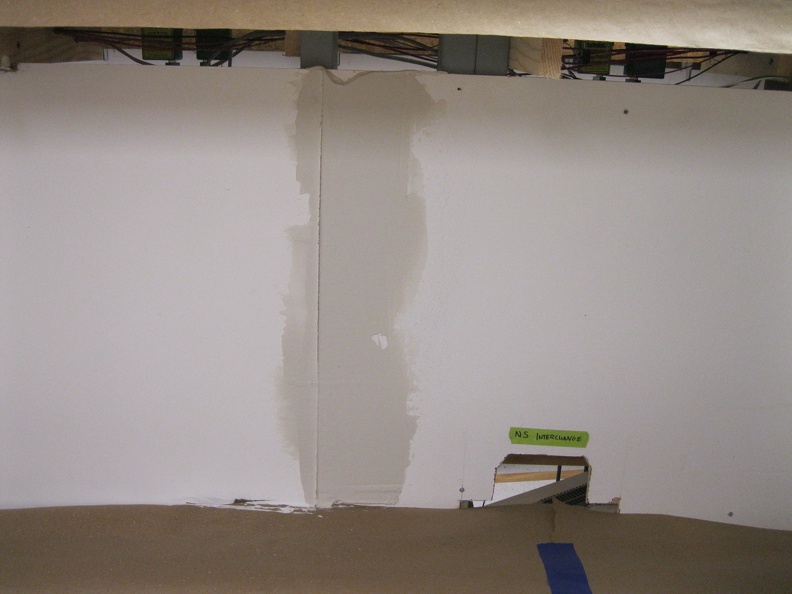
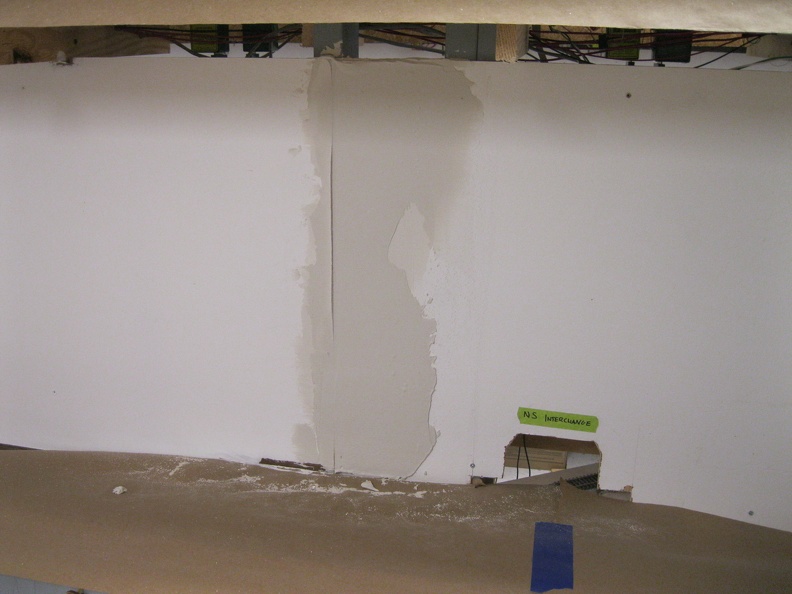
When I installed the backdrops, I overlapped a couple of joints and had other joints that were not very tight. I was okay with living with the visual distraction at the time, but after looking at it more and more, I grew dissatisfied with the appearance.
I thought that using some drywall mud would be an easy solution to smooth over the joint areas, so I've started that process. I'm currently at 2nd coats and I figure I will need to get to about 4 or 5 with sandings in between until I'm happy enough with it.
I thought that using some drywall mud would be an easy solution to smooth over the joint areas, so I've started that process. I'm currently at 2nd coats and I figure I will need to get to about 4 or 5 with sandings in between until I'm happy enough with it.
 |
| First coat just applied and still wet |
 |
| Second coat applied after some sanding action. |
Friday, September 12, 2014
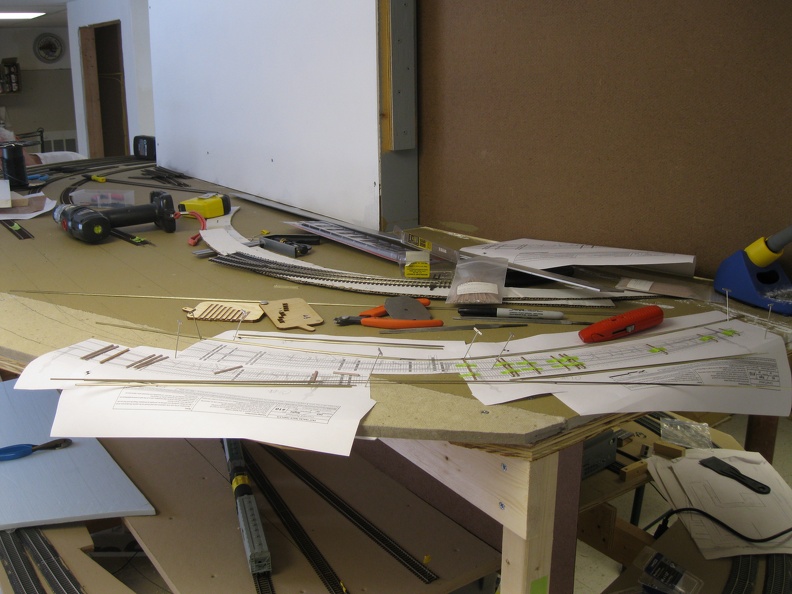
Handlaying Track or What Confidence Can Get You
When I started building this layout, I had no experience with track beyond buying commercial components and plopping them down.
I was a pretty heavy user of the Atlas #8, primarily in code 83 and before I began building, I had spend some coin at various train shows and stocked up on track. I was able to build up a stock of #8s and #6s at less than $10 a turnout, so I was doing pretty well.
Once I started building, I got the to point where I exhausted my stock and got some sticker shock at purchasing more turnouts. You can read my old post here that covers all that and my initial impressions of using the Fast Tracks jigs to build single turnouts, crossovers and ladders.
At this point, I've expanded my stable of fast tracks jigs to include #6 and #10 turnouts, to match the #8 I started with, and I've built every configuration of #8 (including a scissors crossover) and also #6 (no crossovers, as I don't have a need).
Expanding the staging yard and making four of the tracks through meant that I needed to build a closing ladder. I did some measuring and realized that if I used standard (straight) turnouts, I would have much shorter tracks than I would like and I would probably have an S curve or two as well. I wasn't enthusiastic about either option so I thought I might go the curved turnout route.
I had a curved #7.5 from Walthers/Shinohara on hand already, so I used that to test fit and see if it would work. It looked doable, so I looked to see where I could pick up 2 more.. Reality smacked me in the face, as Walthers was out of stock, with no estimated date for stock and when I found them at a couple of online hobby shops, pricing was near $50 each. Ouch! With the train budget being tight after a splurge at the National Train Show in July plus the show in Virginia Beach coming up, I thought that maybe I could give it a try and build a couple from the templates that you can download from Fast Tracks. It would only cost me some time as I had everything else I would need and I had a Saturday free, so I gave it a shot.
Without the experience of building all the turnouts from the jigs, I never would have had the confidence to attempt this build.
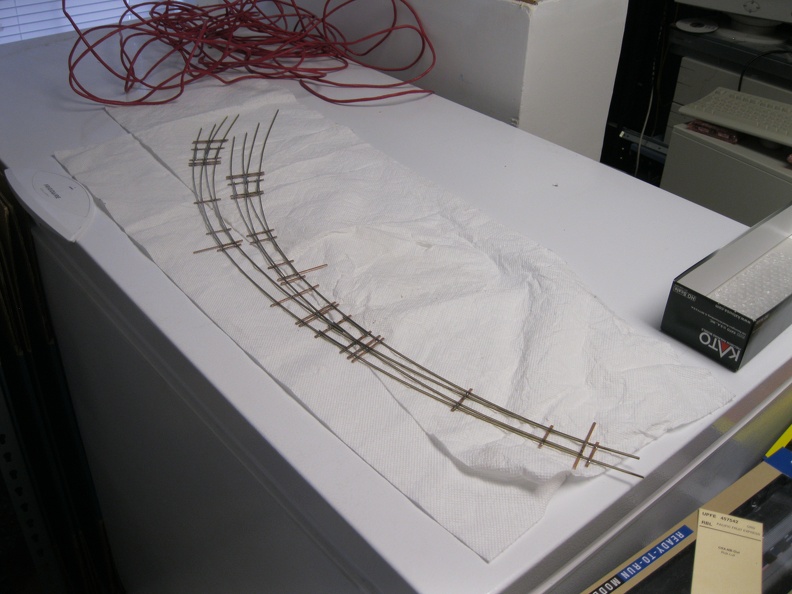
I ended up using two #10s on the outside, main line curve (which becomes staging track 7) one a 36/30 radius pair and the other a 30/27 radius pair. Inside off the 36/30, I used a #8, 30/24 radius. In retrospect, I might have been better off making the 36/30 another 30/27, but I'll know for next time.
I started with the furthest inside stock rail as my datum point. I tried to hold as close to the templates as possible, but a couple of spots missed, so I had to use the NMRA gauge to keep everything correct.

I'm working now on getting ties glued down and I hope to get this assembly spiked down in the next few days.
A very rewarding project and one that I'm maybe just a bit too proud of, or maybe not. :)
I was a pretty heavy user of the Atlas #8, primarily in code 83 and before I began building, I had spend some coin at various train shows and stocked up on track. I was able to build up a stock of #8s and #6s at less than $10 a turnout, so I was doing pretty well.
Once I started building, I got the to point where I exhausted my stock and got some sticker shock at purchasing more turnouts. You can read my old post here that covers all that and my initial impressions of using the Fast Tracks jigs to build single turnouts, crossovers and ladders.
At this point, I've expanded my stable of fast tracks jigs to include #6 and #10 turnouts, to match the #8 I started with, and I've built every configuration of #8 (including a scissors crossover) and also #6 (no crossovers, as I don't have a need).
Expanding the staging yard and making four of the tracks through meant that I needed to build a closing ladder. I did some measuring and realized that if I used standard (straight) turnouts, I would have much shorter tracks than I would like and I would probably have an S curve or two as well. I wasn't enthusiastic about either option so I thought I might go the curved turnout route.
I had a curved #7.5 from Walthers/Shinohara on hand already, so I used that to test fit and see if it would work. It looked doable, so I looked to see where I could pick up 2 more.. Reality smacked me in the face, as Walthers was out of stock, with no estimated date for stock and when I found them at a couple of online hobby shops, pricing was near $50 each. Ouch! With the train budget being tight after a splurge at the National Train Show in July plus the show in Virginia Beach coming up, I thought that maybe I could give it a try and build a couple from the templates that you can download from Fast Tracks. It would only cost me some time as I had everything else I would need and I had a Saturday free, so I gave it a shot.
Without the experience of building all the turnouts from the jigs, I never would have had the confidence to attempt this build.
 |
| Templates down and starting to place PCB ties |
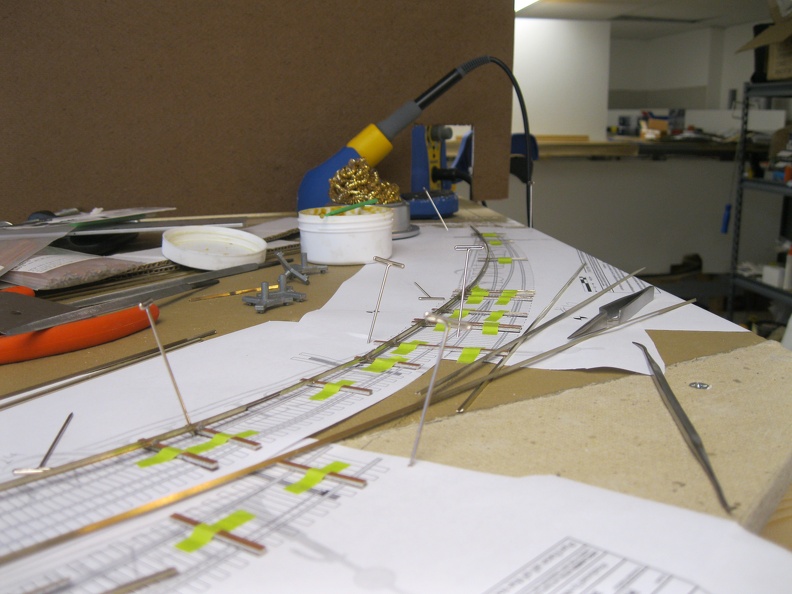 |
| When you build from 3' rail sections, smooth transitions are also automagic! |
 |
| Contemplating my next move |
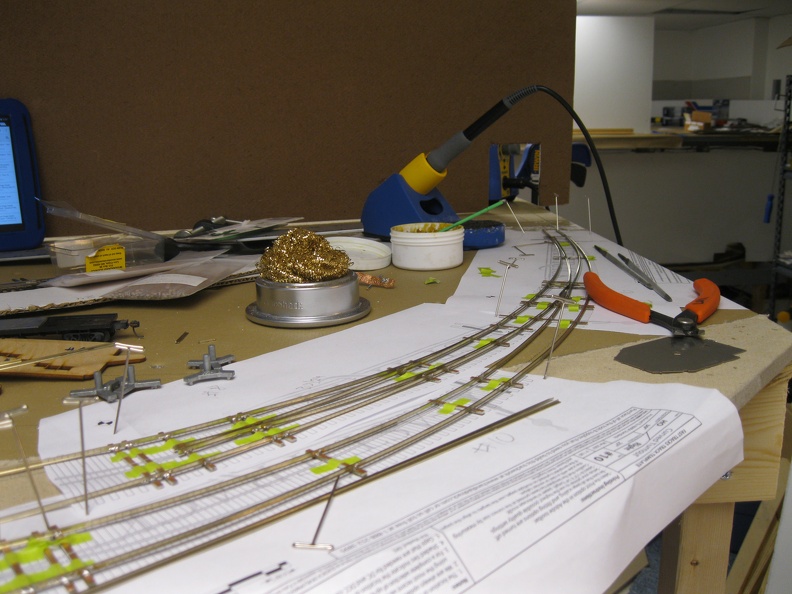 |
| Leading turnout just about complete, 2nd set of points in |
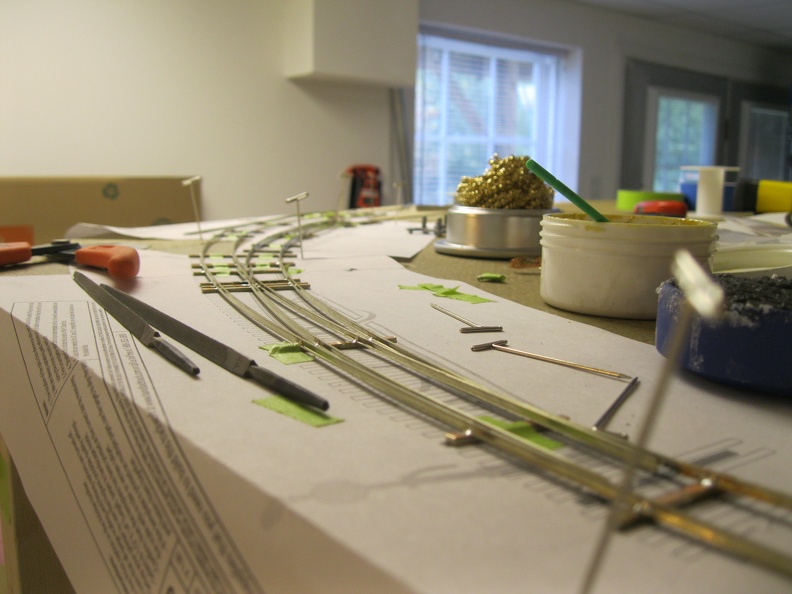
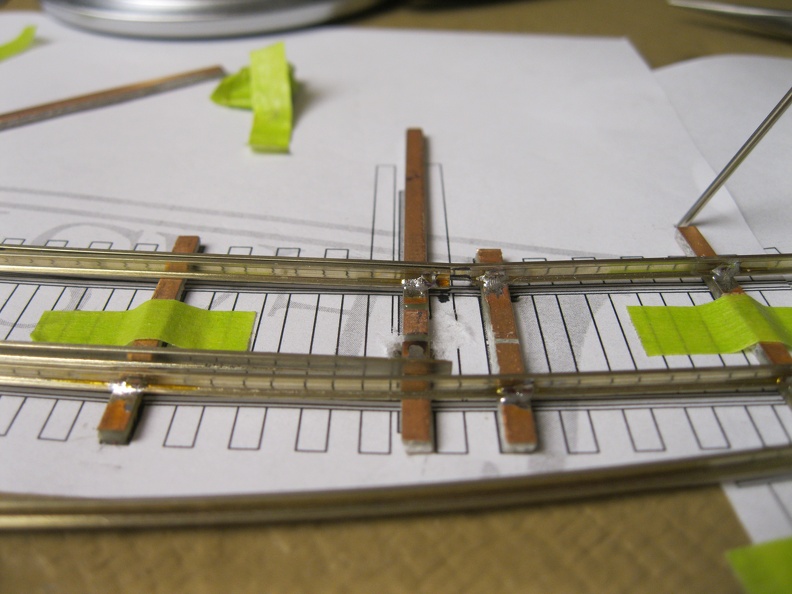 |
| Throw bar in place |
 |
| Completed assembly after I cleaned the flux off. |
A very rewarding project and one that I'm maybe just a bit too proud of, or maybe not. :)
Thursday, September 11, 2014
Modeling Amtrak, Part II, Consists and Prototypes
In my previous post about modeling Amtrak, I wrote the following:
"Next post, I will go into more depth of the consists needed, the prototype cars, and models available, but I want to start with an overview of the issue."
We will hit the consists and talk a little bit about the prototype cars this post. I'm going to save the models for an additional post later on, as I want to take some pictures and make some other documentation available to cover that subject accurately. I've cover the locomotives in an additional post as they are owed an exclusive look, in my opinion.
Generally, you can count on the long distance trains to have a mix of sleepers, a kitchen/diner car, a baggage or two, then coaches and possibly a lounge/snack car.
You might see observation cars (either of the dome or blunt end variety), express cars, dorm cars (usually an older sleeper for the crew's use), and maybe some private varnish at the end.
The shorter distance trains (sometimes called regionals) normally will only have a couple of coaches, and a lounge/snack car. You might see an express car sometimes, and a couple of them have apparently had baggage cars, but normally they will be straight Amfleet cars.
Finding exact information about consists has been a bit tricky and to date, I have only been able to track down a few thanks to Jim Langston's Amtrak clinics. Here are a couple of consists from his clinics that would cover my modeled area:


These snapshots only cover the long distance trains; which makes some sense as Jim is out of the Jacksonville area (IIRC). As to try to find out what there was on the regional and other trains, you are forced to scour the net for pictures, turn up books related the subject area and connect with railfans who might have additional information.
"Next post, I will go into more depth of the consists needed, the prototype cars, and models available, but I want to start with an overview of the issue."
We will hit the consists and talk a little bit about the prototype cars this post. I'm going to save the models for an additional post later on, as I want to take some pictures and make some other documentation available to cover that subject accurately. I've cover the locomotives in an additional post as they are owed an exclusive look, in my opinion.
Consists:
Generally, you can count on the long distance trains to have a mix of sleepers, a kitchen/diner car, a baggage or two, then coaches and possibly a lounge/snack car.
You might see observation cars (either of the dome or blunt end variety), express cars, dorm cars (usually an older sleeper for the crew's use), and maybe some private varnish at the end.
The shorter distance trains (sometimes called regionals) normally will only have a couple of coaches, and a lounge/snack car. You might see an express car sometimes, and a couple of them have apparently had baggage cars, but normally they will be straight Amfleet cars.
Finding exact information about consists has been a bit tricky and to date, I have only been able to track down a few thanks to Jim Langston's Amtrak clinics. Here are a couple of consists from his clinics that would cover my modeled area:
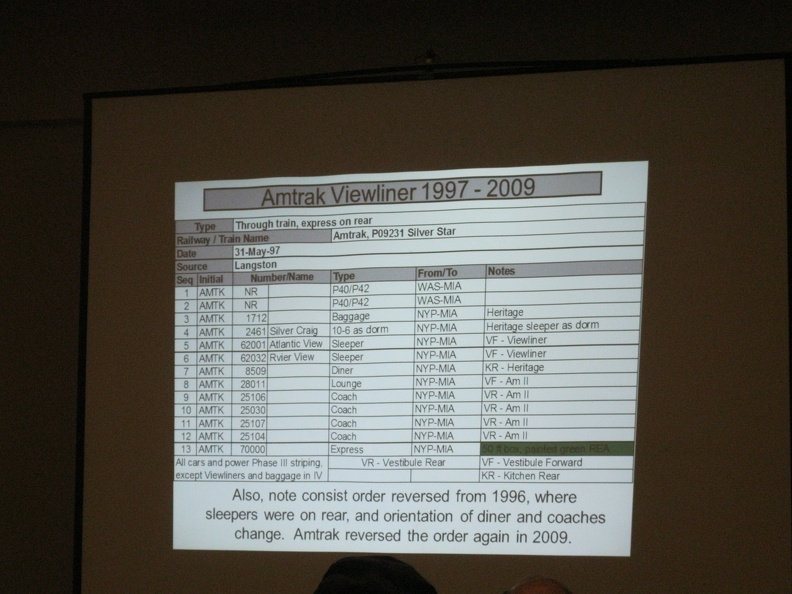
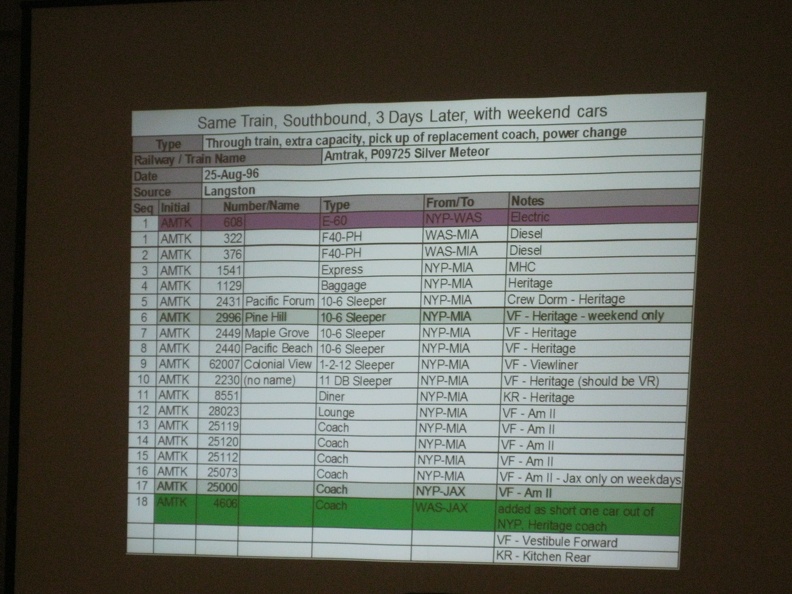
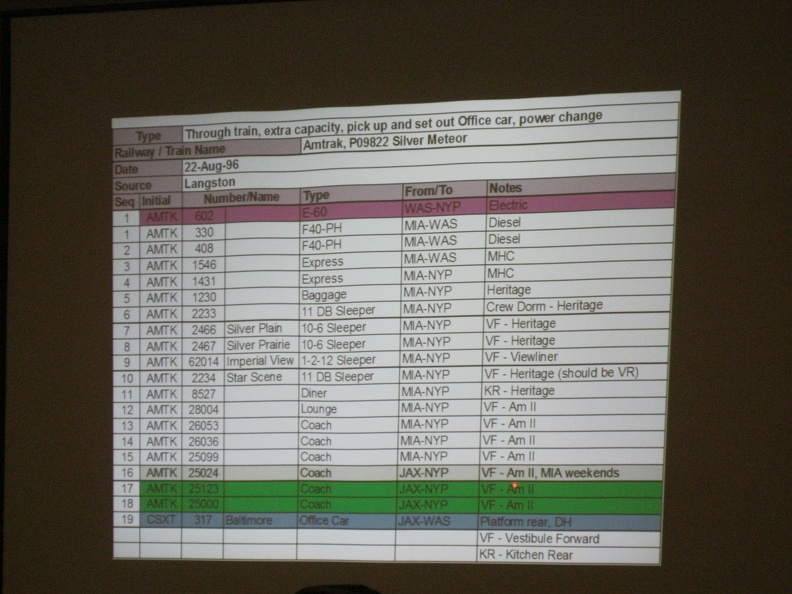
These snapshots only cover the long distance trains; which makes some sense as Jim is out of the Jacksonville area (IIRC). As to try to find out what there was on the regional and other trains, you are forced to scour the net for pictures, turn up books related the subject area and connect with railfans who might have additional information.
Prototype Cars:
A nice thing about the prototype cars: there are pictures galore all over the place so finding examples is easy. A not-so-nice thing: Being able to know when and where particular cars were introduced to service, and when they were retired can be a tricky subject. One resource that has made it better is the book, Amtrak By the Numbers which lists just about every locomotive and car they've used. It includes when they were built, bought or acquired, if they were renumbered, what happened to them and the like. An invaluable resource and for $75, well worth it if you take your attempts seriously. In the time frame and location I model, a couple of car types will cover the majority of what I need to be concerned with: Amfleet (both I and IIs), Heritage (aka cars adopted by Amtrak when they took over passenger service in May 1971 from the railroads), and Superliner.Amfleet
Amfleet refers to the cylinder shaped, single level cars in current use; they are primarily coaches, but some lounges and cafes exist among them. Keep in mind two series of these were built, both by the Budd Company. Wikipedia has a decent overview and typing Amfleet into google will give you results for days as well as images. I don't myself have a good Amfleet picture handy, so I'll have to take some an update this later.Heritage
Heritage cars are what Amtrak inherited from the railroads in May 1971 when Amtrak took over passenger service for a majority of the railroads. There were a few holdouts until later, but 90% or more became Amtrak. These cars were a mix of coaches, sleepers, baggages, diners, etc that were built from the 1930's to the 1950's. By the 1960's, not many railroads were spending money on new passenger cars, but post World War II, many railroads spent some serious coin on buying new varnish. I've read that Amtrak looked at 3000ish cars and took less than half; 1200 is what Amtrak themselves cite here. Somebody was using their noggin when this was done and took only stuff post WWII built (1946 and later); most of the cars were built by Budd, with a good seasoning of Pullman, ACF, and St Louis Car. Now, when Amtrak got these cars, they were all steam heat, as that was the standard from the previous age, but going forward this ended up being a big problem. Starting about 1977, Amtrak kicked off a rebuilding program to convert the cars to HEP (Head End Power) for climate control, lighting, and similar needs. Lots of history in these cars and a good portion of these are still plying the rails over 40 years later. Supposedly, Amtrak will be replacing these starting 2015, but I'm going to guess that is budget driven, so we will see what happens.Superliner
The Superliner cars are two level cars that were inspired by the Hi-Level cars that Budd built for ATSF beginning 1954 for El Capitan service. Amtrak got a bunch of these (and according to wikipedia, 5 are still in service as I write this in 2014) and then commissioned the Superliners from Pullman-Standard. Now, these cars are pretty darn tall (16' 2") so they are excess height, which restricts them from being operated in many corridors that Amtrak services; most notably the Northeastern Corridor. (Which means from Washington, DC to Boston, MA). We see them in Richmond due to their use on the Auto-Train, which originates in Lorton, VA, south of Union Station in DC and the height restrictions in the First Street Tunnel (17 foot clearance). Like the Amfleets, the Superliners were built in two series, by two different manufacturers. One of the quick spotting differences are the trucks; the original series uses a German designed truck, while the second series uses a General Steel Casting truck and they are very different, even at a glance.Wednesday, September 10, 2014
Unintended consequences of backdrops
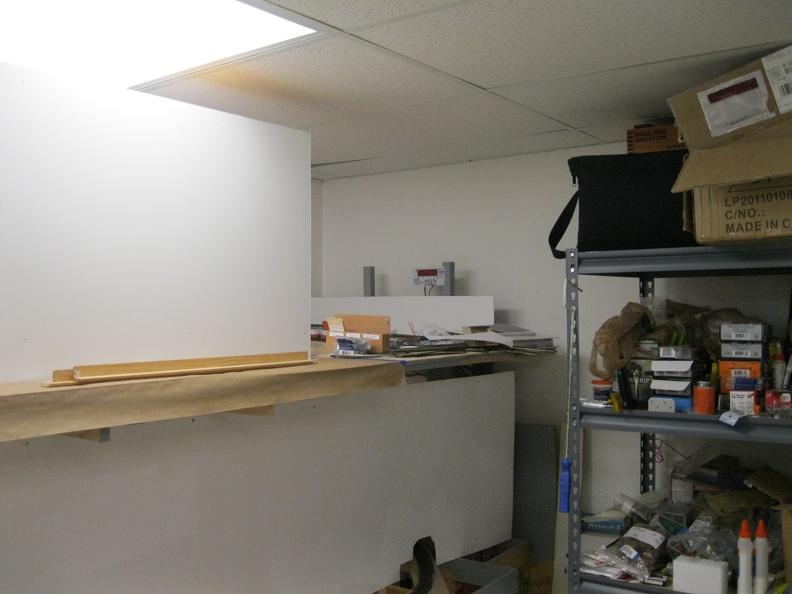
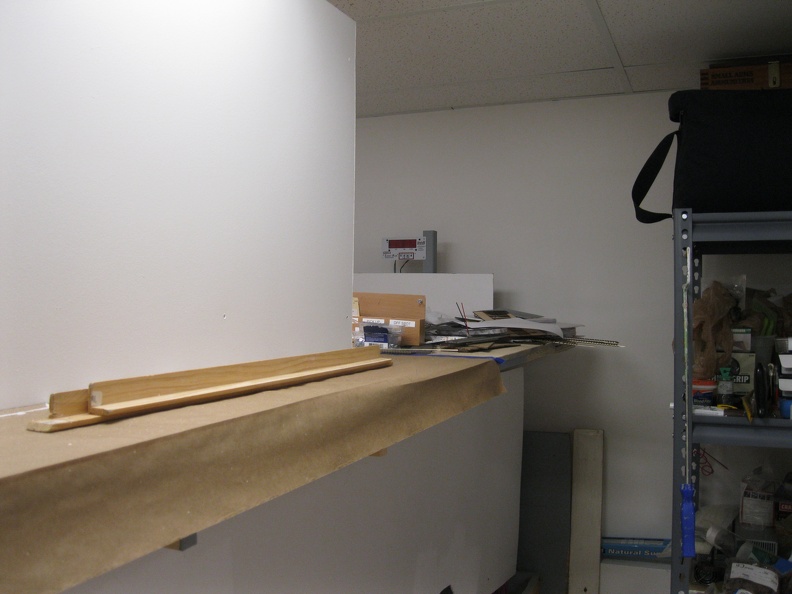
Since I've put the backdrops up, I've reduced the ability to see from one side of the layout to another. One of these issues is that the fast clocks are no longer easily visible from most locations on the layout.
I had one of the fast clocks installed on the inside of the peninsula, in the area that the back drop would be placed; while the other was at the end of the aisle way, next to Acca, above the top level.
This fast clock gave everybody that was working inside the peninsula a time reference, and was viewable from the DoD area as well.
This clock was for the rest of the railroad.
The dispatcher had a window open from JMRI that synced up with the clocks on the railroad, so that was his clock.
After putting up the backdrops, I did not want to cut holes in them to place the fast clocks (or the radio base stations for Digitrax), so I started thinking about my options.
The main requirement is that the crews needed to be able to see the clocks.

This clock was moved over to the next post in line, allowing it to be sighted from the inside peninsula area.

The clock that was in here, was mounted to the wall just outside the dispatcher's office. I think that picture is still on the camera, so I'll add it to this post a bit later.
I had one of the fast clocks installed on the inside of the peninsula, in the area that the back drop would be placed; while the other was at the end of the aisle way, next to Acca, above the top level.
 |
| Taking this same shot today would be very different! |
 |
| This is a fairly old photo - the wall board hasn't been installed on the wall above the upper deck on the left side yet. Wow. |
The dispatcher had a window open from JMRI that synced up with the clocks on the railroad, so that was his clock.
After putting up the backdrops, I did not want to cut holes in them to place the fast clocks (or the radio base stations for Digitrax), so I started thinking about my options.
The main requirement is that the crews needed to be able to see the clocks.
This clock was moved over to the next post in line, allowing it to be sighted from the inside peninsula area.
The clock that was in here, was mounted to the wall just outside the dispatcher's office. I think that picture is still on the camera, so I'll add it to this post a bit later.
Tuesday, September 9, 2014
Staging tracks going back into place
As the staging yard is coming back together, I've come to the track laying phase.
When I pulled everything apart as the rebuild started, I marked the existing staging tracks with bits of labeled tape so I could easily put track back in its place and speed the process.
One issue I was able to fix was adding insulated rail joiners on the DCC "A" rail, which would isolate the ladder from each individual staging track. (Which have on/off switches for track power, saving the crew and myself to having to listen to a bunch of idle units running)

One of the reasons to rebuild the yard was to make the tracks longer and bend a few of them around the corner to enable me to double end them and complete a reverse loop.


When I pulled everything apart as the rebuild started, I marked the existing staging tracks with bits of labeled tape so I could easily put track back in its place and speed the process.
One issue I was able to fix was adding insulated rail joiners on the DCC "A" rail, which would isolate the ladder from each individual staging track. (Which have on/off switches for track power, saving the crew and myself to having to listen to a bunch of idle units running)
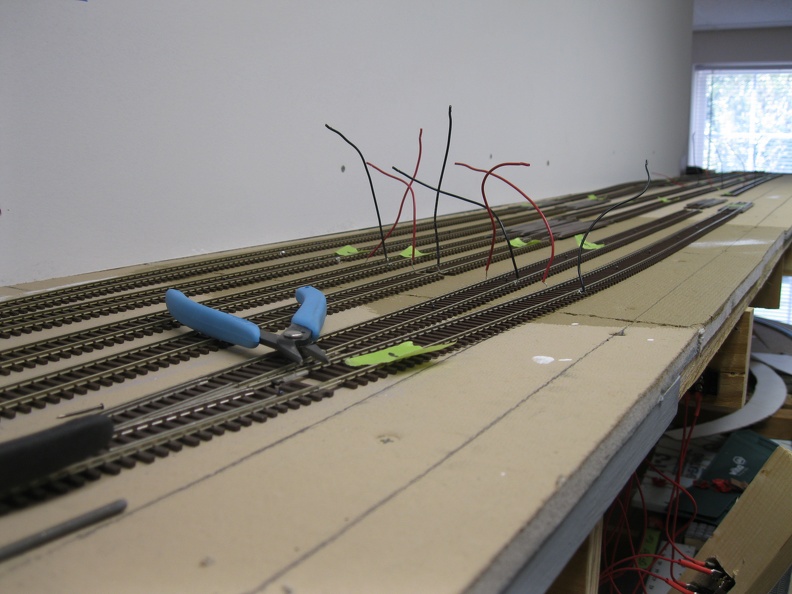 |
| Starting the process. I put the first piece of flex track and rerailer down first. |
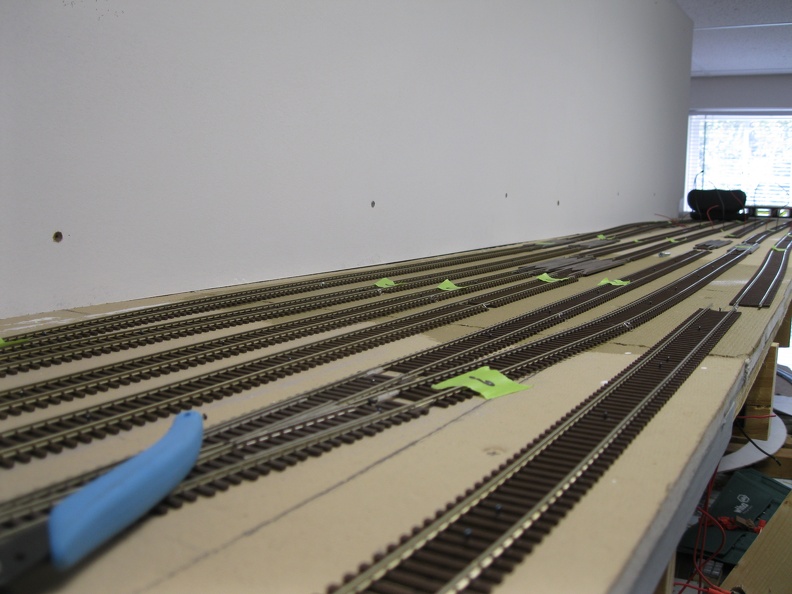
One of the reasons to rebuild the yard was to make the tracks longer and bend a few of them around the corner to enable me to double end them and complete a reverse loop.
6 of the 7 tracks will curve around, but the last 4 (the 4 tracks on the right in the above picture) will be double ended while the others will just be stubbed.
When I originally wrote this post, I was contemplating my options for the (new) yard ladder on the far side. Since then, I've mocked up and built a couple of curved turnouts for this area. More on that in a later post.
Saturday, September 6, 2014
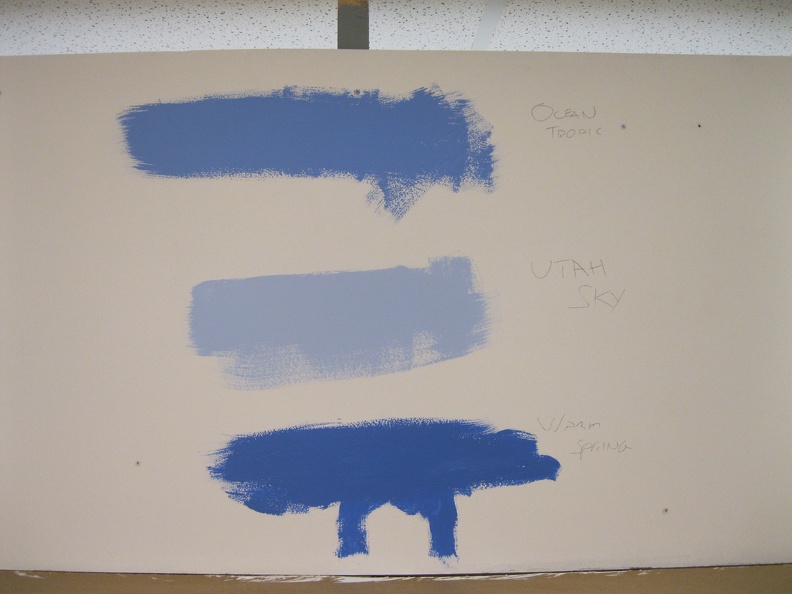
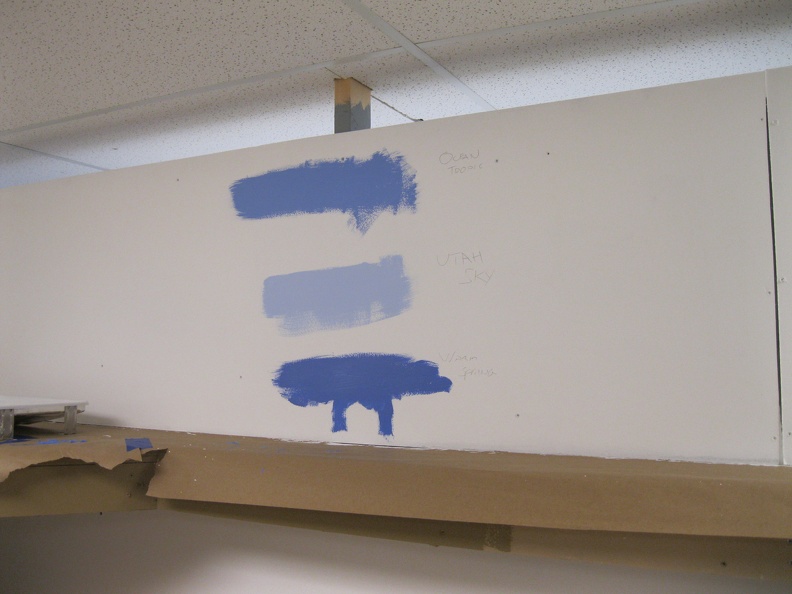
Sky Blue Backdrops
Now that I have backdrops up, time for some actual color.
I wanted to accurately show the color of the sky - the horizon is very light blue, almost a gray, and as you look higher and higher, the color shifts to a deeper and deeper blue.
I got three samples of different blues and put them onto my white primed backdrops to give me an idea of my final result.
All colors are flat; in other words they don't reflect much light, unlike a satin or gloss finish.
I think I will put the Utah Sky choice at the horizon line and then blend into the ocean tropic. I believe warm spring is just too blue in person, but I might just use it for the top inch or so, as it seems to work better in pictures.
I wanted to accurately show the color of the sky - the horizon is very light blue, almost a gray, and as you look higher and higher, the color shifts to a deeper and deeper blue.
I got three samples of different blues and put them onto my white primed backdrops to give me an idea of my final result.
All colors are flat; in other words they don't reflect much light, unlike a satin or gloss finish.
 |
| Straight on |
 |
| Not as close or as good of a snap, but gives a little bit better idea. |
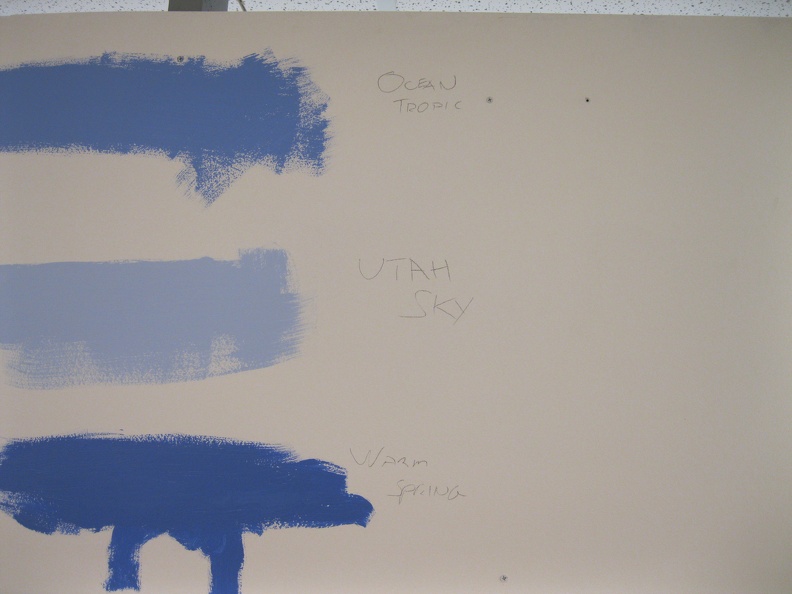 |
| I wrote the color next to each sample so I would know what is what. |
Friday, September 5, 2014
Measure a bunch of times, then cut...
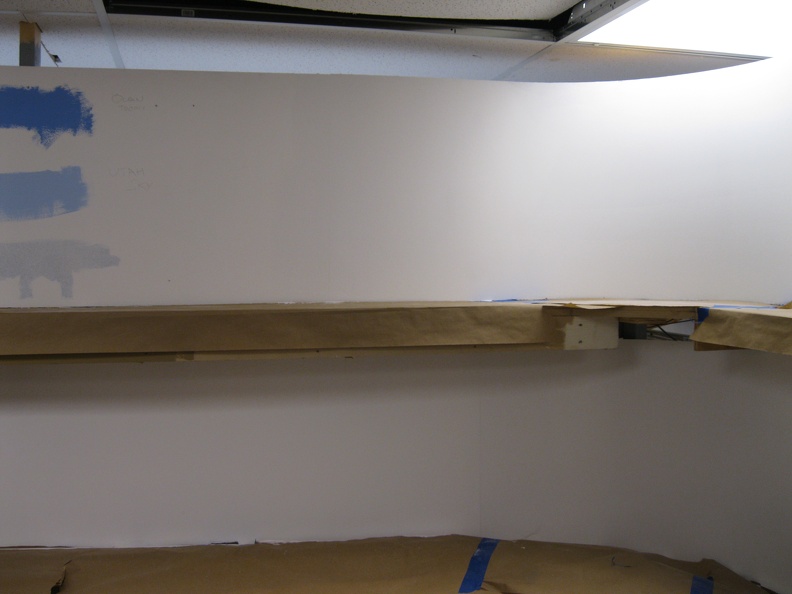
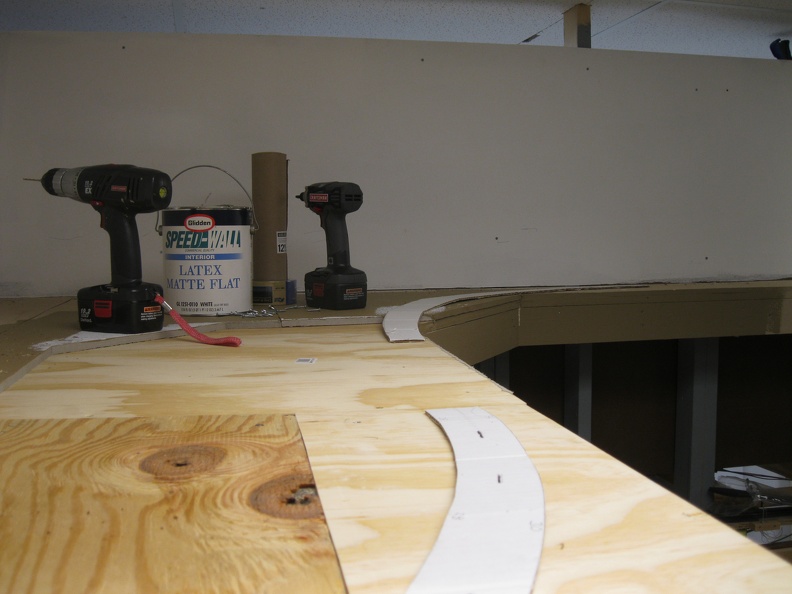
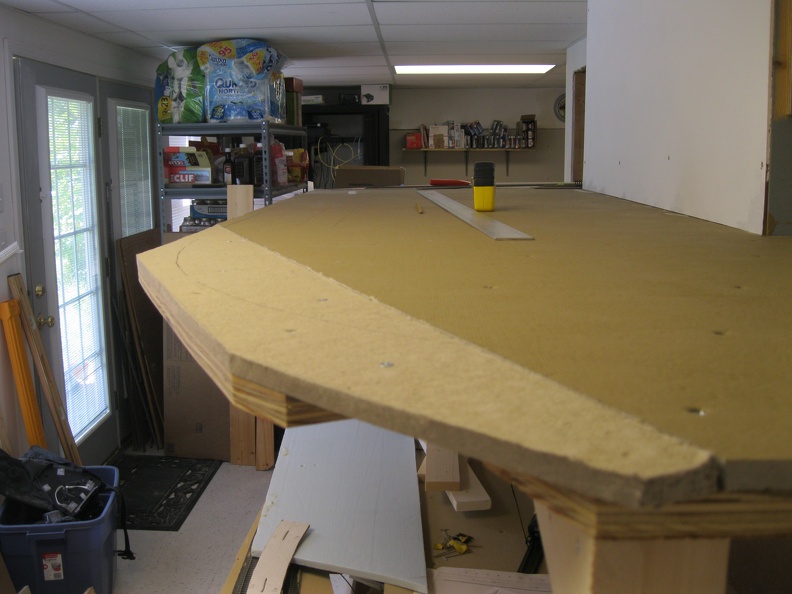
So, when I finished the benchwork for the upper staging yard, I did not realize that keeping the same radius as elsewhere on the railroad meant I needed to not trim off so much.
Oops.
I took two different approaches to fix the issue. On the inside of the peninsula, I was able to put in a new piece of plywood and give myself the support I needed.


On the opposite site, the situation was a bit different as that side had been cut from a large piece of plywood with a smaller trim piece added. This meant that the solution on the opposite side wasn't a good fit.
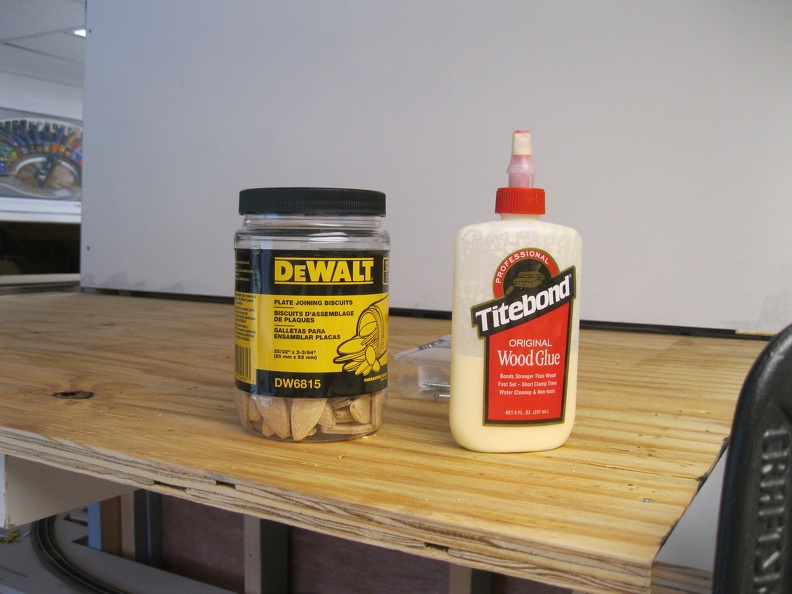
Enter a biscuit joiner.

Shots of the finished products:


Oops.
I took two different approaches to fix the issue. On the inside of the peninsula, I was able to put in a new piece of plywood and give myself the support I needed.
On the opposite site, the situation was a bit different as that side had been cut from a large piece of plywood with a smaller trim piece added. This meant that the solution on the opposite side wasn't a good fit.
Enter a biscuit joiner.
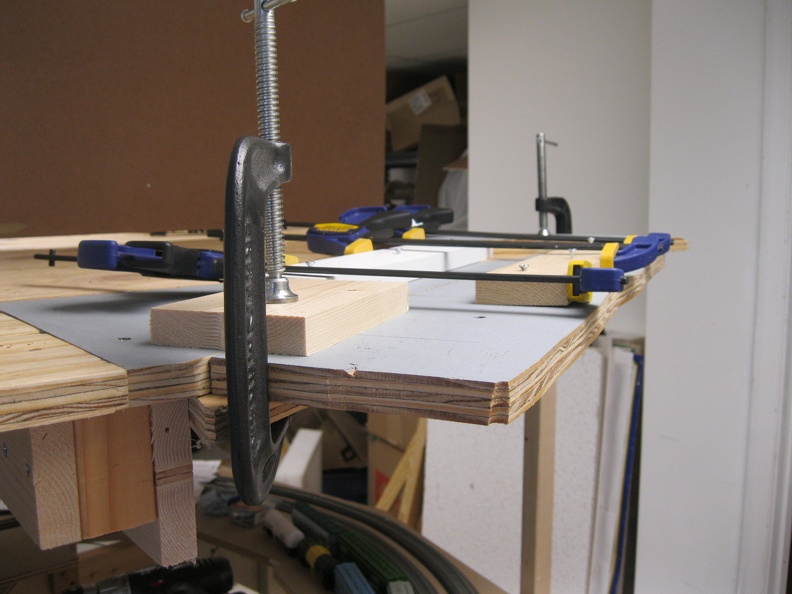 |
| 5 biscuits and some glue.. Lots of clamps to keep it together while it dried. |
Subscribe to:
Posts (Atom)